Android开发中需要注意的点

本文持续更新,主要记录日常Android开发过程中遇到的一些问题及解决办法和需要注意的一些点。

  • 建议每个Android开发者都搭配一套抓包的环境(Charles、Fiddler),这样就能很方便的看到打开一个页面后发起了哪些网络请求、时序,以及每个请求的耗时、数据包大小,便于进行接口调试、优化等。

  • ListView的headerView和footerView设置setVisibility(View.GONE)无效,headerView和footerView虽然不显示了,但还是会占位,会显示一块空白区域。如果headerView和footerView不打算使用了,可是调用ListView的removeHeaderView()、removeFooterView()方法;如果有多个headerView,只是想展示隐藏其中的一个,后面可能还会用到再显示出来,可以使用下面的方法:

    1
    2
    3
    4
    5
    6
    7
    8
    9
    FrameLayout frameLayout = new FrameLayout(this);
    listView.addFooterView(frameLayout);
    ......
    ......
    //For adding footerView
    frameLayout.removeAllViews();
    frameLayout.addView(mFooterView);
    //For hide FooterView
    frameLayout.removeAllViews();
  • 使用自定义shape的方式作为Button的背景时,开发机上显示白色的,但在有些手机上显示出来的颜色有可能是黑色的,原因在于不同的品牌和ROM预置的主题风格不同,有些是light,有些可能会是dark。解决的办法是在定义shape的时候指定solid:

    1
    2
    3
    4
    5
    6
    7
    8
    9
    10
    11
    12
    13
    14
    15
    16
    17
    18
    <?xml version="1.0" encoding="utf-8"?>
    <selector xmlns:android="http://schemas.android.com/apk/res/android">
    <item android:state_pressed="true">
    <shape android:shape="oval">
    <solid android:color="@color/transparent" />
    <stroke android:width="0.5dp" android:color="@color/t_grey_title" />
    <corners android:radius="2dp" />
    </shape>
    </item>
    <item>
    <shape android:shape="oval">
    <solid android:color="@color/transparent" />
    <stroke android:width="0.5dp" android:color="@color/bg_line" />
    <corners android:radius="2dp" />
    </shape>
    </item>
    </selector>
  • 通过Intent调起手机拨号页面的功能大多数APP都有,但是有一点需要注意,该操作运行在没有电话和短信功能的Android平板上会FC。解决办法是startActivity之前判断一下系统能否处理打电话或发短信的Intent:

    1
    2
    3
    4
    5
    private boolean isIntentAvailable(Intent intent) {
    PackageManager packageManager = getPackageManager();
    List<?> list = packageManager.queryIntentActivities(intent, PackageManager.MATCH_DEFAULT_ONLY);
    return list.size() > 0;
    }
  • 如果要在代码中设置TextView或者Button的color,而该color定义的selecter资源的话,直接使用textView.setTextColor(getResources().getColorStateList(R.color.radio_text_color))只能显示默认状态下的颜色,点击时颜色不会变,需要使用下面的方法:

    1
    textView.setTextColor(getResources().getColorStateList((R.color.radio_text_color)));
阅读全文

Android原生计算器源码分析

今天逛Google Play无意间发现Google把原生计算器应用单独发布了,

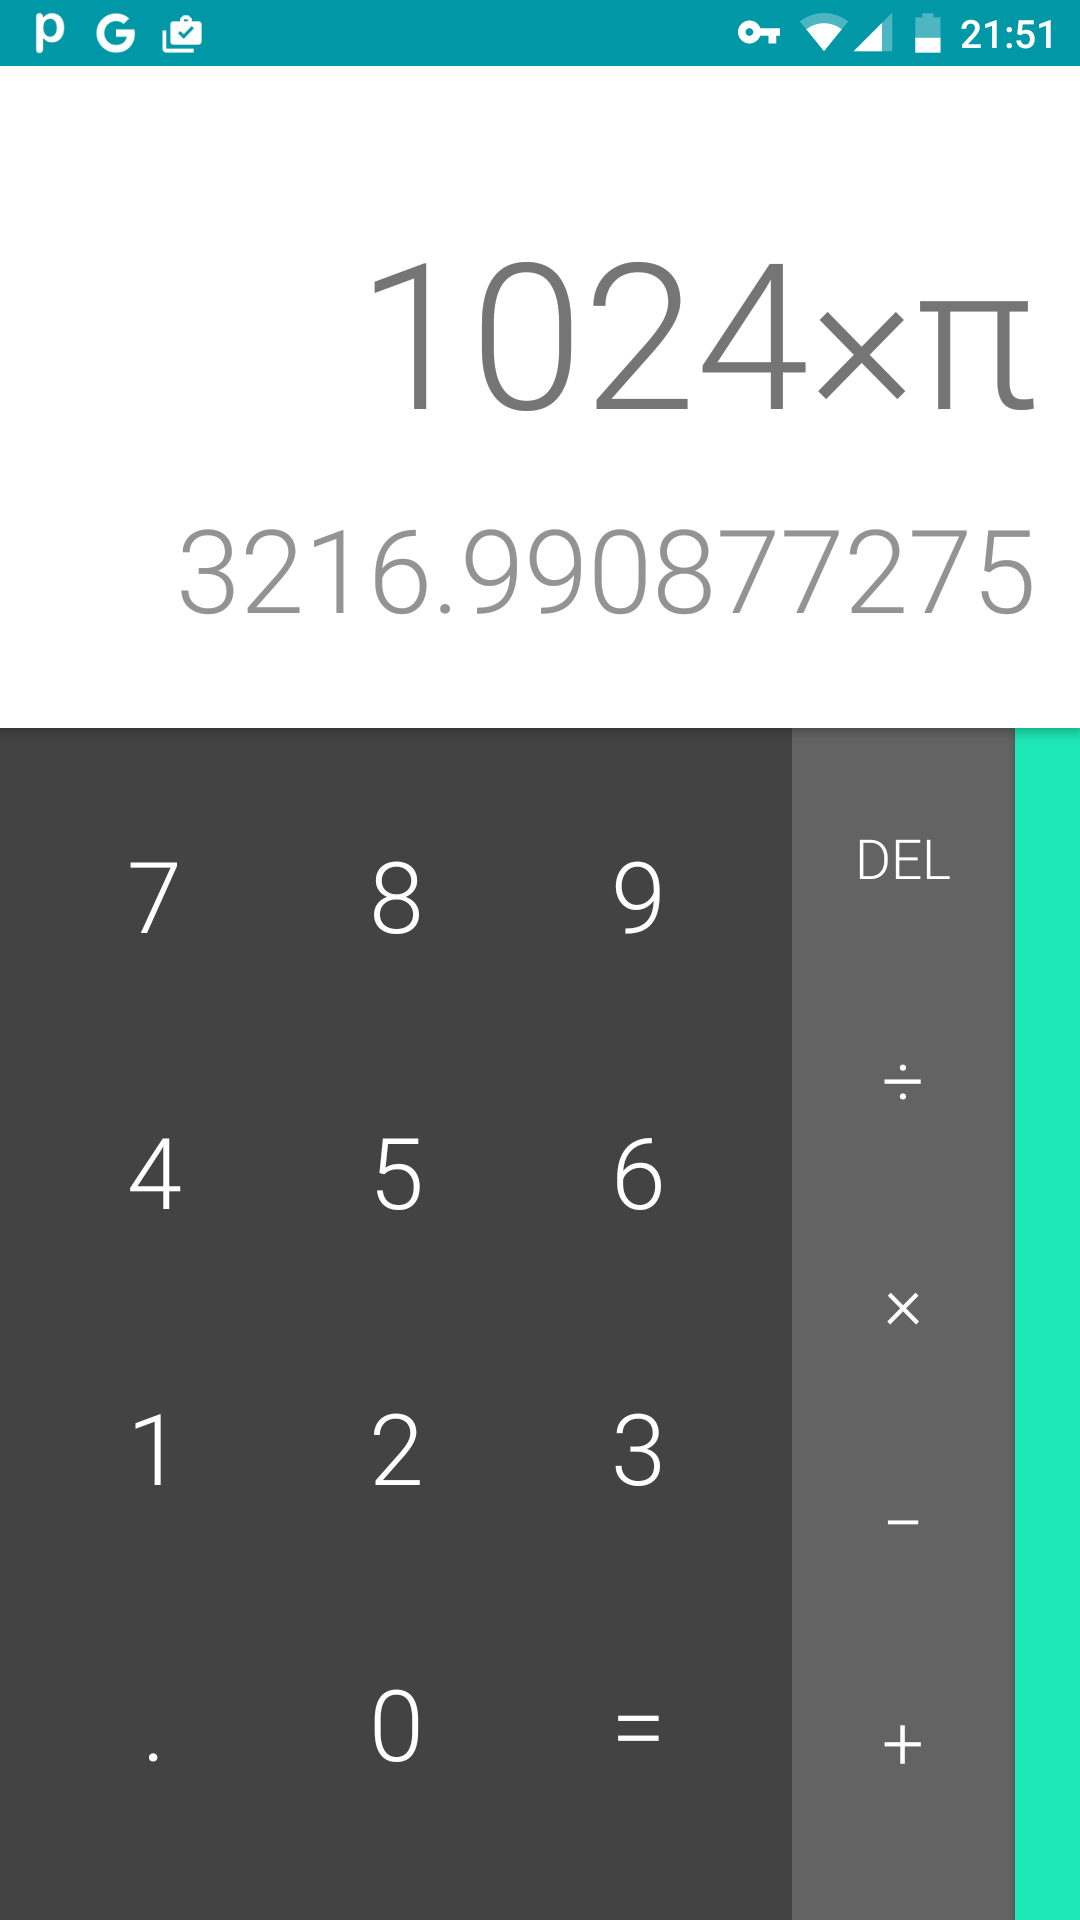
这几年虽然一直坚持使用原生Android系统,但由于计算器这种工具软件使用频率较低(也就每个月填报销的时候打开用一下),一直没怎么特别留意,今天特意使用了一会,发现设计还是有很多亮点的,符合Google简洁、易用的风格。

这是打开应用后的主页:

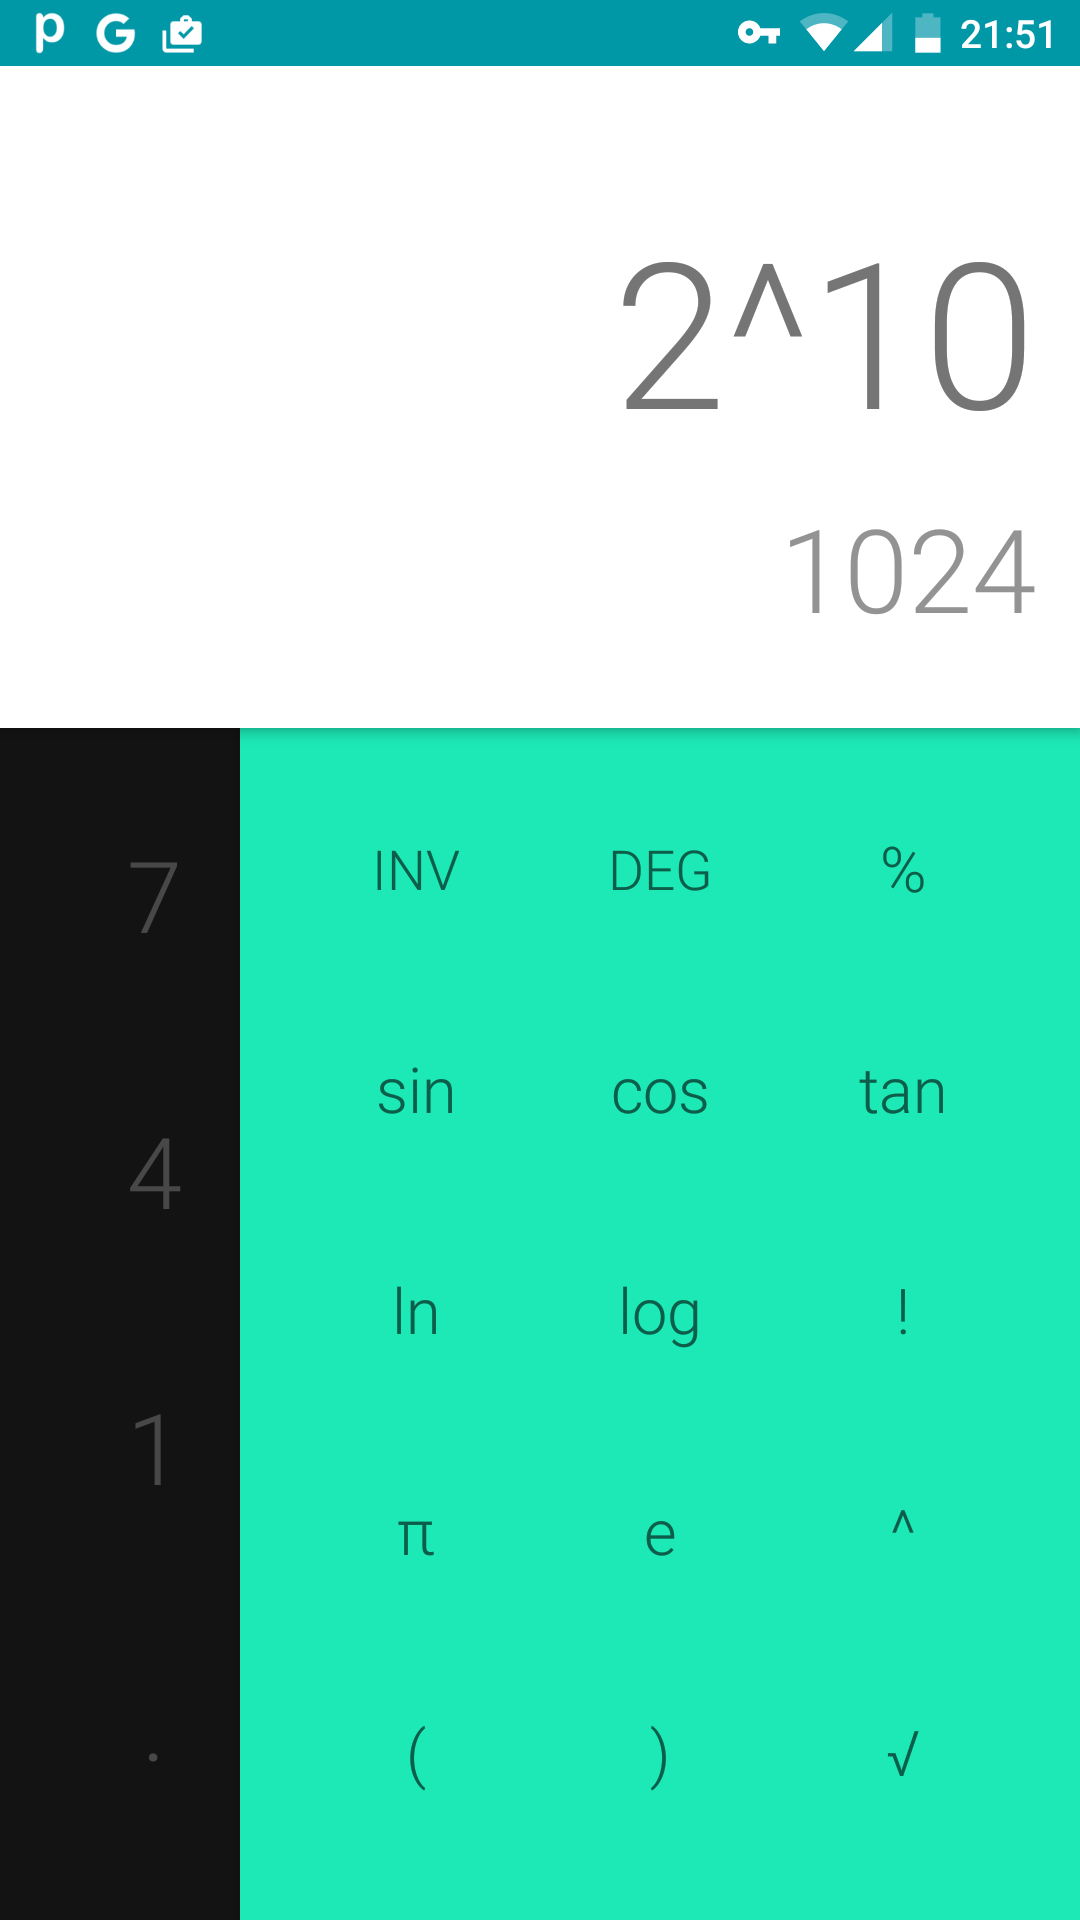
这是滑动显示数学公式后的页面:

为了描述方便,我们把第一页(也就是包含0-9数字和常用+-×/=操作的页面)称为page1,把显示数学计算公式的页面称为page2,手指在page1向左滑动,page2会从屏幕后侧缓缓滑入,滑动的过程中page1位置保持不动,page2完全滑入后也没有把page1完全覆盖,左边还是留有间距的,想回到page1只需要往右一滑就可以了,而这个过程中page2则是从屏幕右侧缓缓滑出。

有点像水平方向的抽屉,设计比较新颖,看一下它的源码。

先从googlesourse把源码clone到本地

1
git clone https://android.googlesource.com/platform/packages/apps/Calculator

然后导入Android Studio,从清单文件找到应用的入口Activity————Calculator.java,看一下它的布局文件,由于计算器的源码适配了不同分辨率、不同屏幕方向的的手机和pad,我们只分析一种就行了

阅读全文

根据URL生成缓存key算法

在Android开发中,经常会使用到缓存,尤其是进行图片加载的时候,我们会先把一个URL对应的图片下载下来,保存到本地文件和内存中,以便下次再次再次用到该图片的时候能够从内存缓存和本地文件缓存中直接读取。这里有一个图片URL映射到缓存key的算法问题,今天在看源码的时候发现volley和picasso的算法不同,这里做一个记录。

volley使用的是hashcode

1
2
3
4
5
6
7
8
9
10
11
/**
* Creates a pseudo-unique filename for the specified cache key.
* @param key The key to generate a file name for.
* @return A pseudo-unique filename.
*/
private String getFilenameForKey(String key) {
int firstHalfLength = key.length() / 2;
String localFilename = String.valueOf(key.substring(0, firstHalfLength).hashCode());
localFilename += String.valueOf(key.substring(firstHalfLength).hashCode());
return localFilename;
}

这里有一个特殊的地方,并不是单纯的调用String.hashCode()方法,而是先把url从中间分割成两部分,然后对这两部分分别求其hashCode值,最后把这两个hashCode值分别转化为字符串类型再拼接起来。这里为什么要这么做刚开始不太理解,回忆一下hashCode()方法的实现就明白了。

1
2
3
4
5
6
7
8
9
10
11
public int hashCode() {
int h = hash;
if (h == 0 && value.length > 0) {
char val[] = value;
for (int i = 0; i < value.length; i++) {
h = 31 * h + val[i];
}
hash = h;
}
return h;
}

hashCode()最终返回的会是字符数组中每个位置的字母的ascii码值再加上上一次hash值乘以31,其实这种算法并不能保证不同的字符串得出的int值是唯一的,乌云上也见过一些攻击正是利用hashCode的逆向算法来做的。把字符串分割两份,分别求hashCode,再转化为字符串拼接到一块,在算法时间复杂度不变的情况下,可以尽可能的降低hash碰撞。

picasso使用的是MD5

1
2
3
4
5
6
7
8
9
10
11
12
13
14
15
16
17
18
19
20
21
22
23
24
private String uriToKey(URI uri) {
try {
MessageDigest messageDigest = MessageDigest.getInstance("MD5");
byte[] md5bytes = messageDigest.digest(uri.toString().getBytes("UTF-8"));
return bytesToHexString(md5bytes);
} catch (NoSuchAlgorithmException e) {
throw new AssertionError(e);
} catch (UnsupportedEncodingException e) {
throw new AssertionError(e);
}
}
private static final char[] DIGITS = { '0', '1', '2', '3', '4', '5', '6', '7', '8', '9', 'a', 'b', 'c', 'd', 'e', 'f' };
private static String bytesToHexString(byte[] bytes) {
char[] digits = DIGITS;
char[] buf = new char[bytes.length * 2];
int c = 0;
for (byte b : bytes) {
buf[c++] = digits[(b >> 4) & 0xf];
buf[c++] = digits[b & 0xf];
}
return new String(buf);
}

md5算法没什么好说的,在项目中用的比较普遍。

HttpResponseCache原理分析

从Android4.0(API 14)开始,SDK源码中新增了一个类:android.net.http.HttpResponseCache.使用这个类可以很方便的对HTTP和HTTPS请求实现cache,所有的缓存逻辑再也不用自己写了,只要你使用HttpURLConnection或者HttpsURLConnection作为默认的网络请求库(也是Google官方建议使用的),底层默认帮你实现的缓存的管理,不支持HttpClient。

根据developer文档介绍,开启HttpResponseCache很简单,只需要几行代码。

1
2
3
4
5
6
7
try {
File httpCacheDir = new File(context.getCacheDir(), "http");
long httpCacheSize = 10 * 1024 * 1024; // 10 MiB
HttpResponseCache.install(httpCacheDir, httpCacheSize);
catch (IOException e) {
Log.i(TAG, "HTTP response cache installation failed:" + e);
}

以上代码会在data/data/packagename/cache/下创建http文件夹,所有的http缓存文件默认都会存放到这个文件夹下,缓存文件夹最大为10M。
如果想兼容4.0以前的版本的话,可以用反射的方式调用。

1
2
3
4
5
6
7
8
9
try {
File httpCacheDir = new File(context.getCacheDir(), "http");
long httpCacheSize = 10 * 1024 * 1024; // 10 MiB
Class.forName("android.net.http.HttpResponseCache")
.getMethod("install", File.class, long.class)
.invoke(null, httpCacheDir, httpCacheSize);
catch (Exception httpResponseCacheNotAvailable) {
}
}

开启完之后,如果服务端接口实现了http缓存协议,客户端发送http请求就会在http文件夹下产生缓存数据,下次再次请求的话,缓存如果还在有效期内,就会从缓存文件中读取。对缓存使用的控制可以通过设置不同的Cache-Control头部。

  • 如果不想使用本地缓存,直接请求服务器最新数据,比如下拉刷新,可以这么设置。

    1
    connection.addRequestProperty("Cache-Control", "no-cache");
  • 如果只想使用本地缓存,不去向服务器请求数据,可以这么设置。

    1
    connection.addRequestProperty("Cache-Control", "only-if-cached");
  • 如果既想使用本地缓存,又怕服务器数据有更新,需要服务器验证,可以这么设置。

    1
    connection.addRequestProperty("Cache-Control", "max-age=0");
  • 如果想设置缓存过期后的有效时间,可以这么设置。

    1
    2
    int maxStale = 60 * 60 * 24 * 28; // tolerate 4-weeks stale
    connection.addRequestProperty("Cache-Control", "max-stale=" + maxStale);

以前看Picasso的源码,发现如果使用HttpUrlConnection就会开启HttpResponseCache,Disk Cache交给HttpResponseCache处理。如果使用OkHttp作为网络请求库,就使用OkHttp自带的Disk Cache。今天感兴趣HttpResponseCache这块底层的实现逻辑,到源码里看一下。

阅读全文

Volley对HTTP缓存的处理

客户端开发中,调用远程服务接口获取数据更新UI是最常见不过的了。有些纯展示的页面服务端数据的更新其实没那么快,如果每次打开这种页面都要向服务器请求数据,而服务端数据可能在你上次请求之后并没有更新数据,这样就造成了流量的浪费,更重要的,每次和服务器交互都是耗时的,获取数据间隙严重影响用户体验,而这一切本是可以避免的(数据明明没有任何更新,为什么还要再次发送请求呢?同样的数据上次已经获取过了啊)。

其实最好的请求是不必与服务器进行通信的请求:通过响应本地的副本,避免所有的网络延迟以及数据传输的成本。HTTP1.1 规范定义了一系列服务器返回的不同的 Cache-Control 指令,控制客户端如何缓存某个响应以及缓存多长时间。Volley按照HTTP规范的定义,实现了请求缓存的功能。

##网络缓存的处理
Volley在初始化的时候默认会启动5个线程,4个network线程和1个cache线程(其实这里可以优化一下,像Picasso那样根据用户网络类型的不同(wifi、4G、3G、2G等),动态设置network线程的数量)。如果一个新的Request添加到RequestQueue之后,请求如果没有设置禁用缓存的话(默认是开启的,mShouldCache = true)会把这次请求添加到cache线程所维护的队列中,看一下CacheDispatcher的run方法。

1
2
3
4
5
6
7
8
9
10
11
12
13
14
15
16
17
18
19
20
21
22
23
24
25
26
27
28
29
30
31
32
33
34
35
36
37
38
39
@Override
public void run() {
if (DEBUG) VolleyLog.v("start new dispatcher");
Process.setThreadPriority(Process.THREAD_PRIORITY_BACKGROUND);
// Make a blocking call to initialize the cache.
mCache.initialize();
while (true) {
try {
// Get a request from the cache triage queue, blocking until
// at least one is available.
final Request<?> request = mCacheQueue.take();
request.addMarker("cache-queue-take");
// If the request has been canceled, don't bother dispatching it.
if (request.isCanceled()) {
request.finish("cache-discard-canceled");
continue;
}
// Attempt to retrieve this item from cache.
Cache.Entry entry = mCache.get(request.getCacheKey());
if (entry == null) {
request.addMarker("cache-miss");
// Cache miss; send off to the network dispatcher.
mNetworkQueue.put(request);
continue;
}
// 下面的代码省略,后面再分析
} catch (InterruptedException e) {
// We may have been interrupted because it was time to quit.
if (mQuit) {
return;
}
continue;
}
}
}

第7行进入死循环之前先初始化DiskBaseCache。
13行BlockingQueue的take()方法会阻塞,直到队列中有元素的时候才会往下继续执行。
23行先尝试从本地的文件缓存中去取,如果取不到数据则把该次请求交给network线程处理。看下NetworkDispatcher的run()方法。

阅读全文

使用TinyPNG批量压缩图片脚本

在Android打包过程中,aapt工具会自动对那些没进行过无损压缩的png图片做无损压缩优化,但是如果你发现项目中用到png、jpg格式的图片还是有些太大、严重影响apk安装包的大小时,可以用TinyPNG工具对项目中用到的图片进行一次压缩。虽然TinyPNG压缩是有损的,但是由于算法很屌,对大多数图片可以减小30%-70%的体积,并且清晰度肉眼基本看不出来变化!这点实在是太诱人了。另外,TinyPNG不止可以压缩png格式,jpg、9图同样可以压缩。但是缺点是在压缩某些带有过渡效果(带alpha值)的图片时,图片会失真,这种情况可以把图片转换位webP格式。

1
2
3
4
5
6
7
8
9
10
11
12
13
14
15
16
17
18
19
20
21
22
23
24
25
26
27
28
29
30
31
32
33
34
35
36
37
38
39
40
41
42
43
44
45
46
47
48
49
50
51
52
53
54
55
56
57
58
59
60
61
62
63
64
65
66
67
68
69
from os.path import dirname
from urllib2 import Request, urlopen
from base64 import b64encode
import json
import sys,os
import time
# created by qianzui at 2014/05/25
key = "" // key替换成自己申请的
src_dir = ""
dest_dir = ""
record = {}
def tinypng (src_dir,dest_dir) :
if os.path.isdir(src_dir) :
for curfile in os.listdir(src_dir) :
#print "current src dir : " + src_dir
#print "current dest dir : " + dest_dir
full_path = os.path.join(src_dir,curfile)
if os.path.isdir(full_path):
tinypng(full_path, os.path.join(dest_dir,curfile))
elif curfile.lower().find(".png") != -1 or curfile.lower().find(".jpg") != -1:
print "current tiny image : " + full_path
if not os.path.isdir(dest_dir) :
os.makedirs(dest_dir)
request = Request("https://api.tinypng.com/shrink", open(full_path, "rb").read())
# add the auth
auth = b64encode(bytes("api:" + key)).decode("ascii")
request.add_header("Authorization", "Basic %s" % auth)
# http post request
response = urlopen(request)
result_json = json.loads(response.read().strip())
print "response json : " + str(result_json)
if response.getcode() == 201 :
# Compression was successful, retrieve output from Location header.
download_url = response.info().getheader("Location")
print "tinypng download url : " + download_url
result = urlopen(download_url).read()
output_path = os.path.join(dest_dir,curfile)
open(output_path, "wb").write(result)
record[full_path] = download_url
print("Success! Compression ratio : " + str(result_json["output"]["ratio"]))
else :
# Something went wrong! You can parse the JSON body for details.
print("error : " + result_json["error"] + "\n message : " + result_json["message"])
def write_record (record_file) :
#write result
output = open(record_file,'w')
for k,v in record.iteritems() :
line = "%s\t%s\n" % (k,v)
line = line.encode('utf-8')
output.write(line)
print "write record completed!"
output.close()
if __name__ == "__main__" :
if len(sys.argv) == 3 :
src_dir = sys.argv[1]
dest_dir = sys.argv[2]
tinypng(src_dir,dest_dir)
record_file = os.path.join(dest_dir,time.strftime("%Y%m%d-%H%M%S") + ".txt")
write_record(record_file)
else :
print "Usage : python image_dir result_dir"

上面是自己写的一个python脚本,逻辑比较简单,就是按照TinyPNG的API规范发送请求,拿到响应结果后读取压缩后图片的url,进行图片下载、保存即可。

支持把指定目录下的图片文件进行TinyPNG批量压缩到指定目录。key自己到tinypng网站上自己申请一个,虽然一个月的请求次数有限制,但对于个人用户来说足够了。

执行: python tinypng.py ~/imagefloder ~/tinypngfloder